Manage data source connections
Access through: Administration > Data source administration
In preparation to load system data, you can create data source connections in the Data source administration feature in Snow Optimizer for SAP® Software. There are also functions to Create Master Synchronization Point, Check connection status, Reload system data, and Assign reporting group.
Contact your SAP system administration team for the setup and maintenance of the required RFC and secondary database connections.
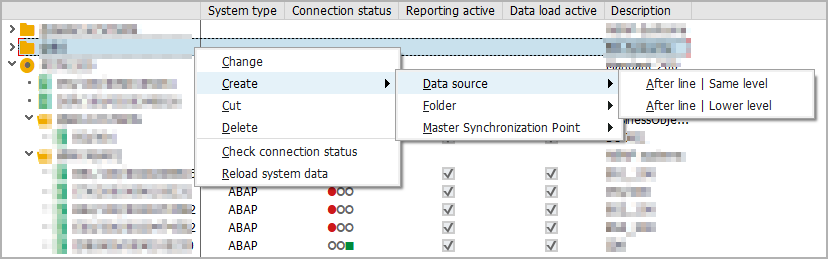
Create data source or folder
Create data source or folder
-
Select
 .
. -
Do one of the following:
-
To create the very first entry:
-
Right-click in the empty area.
-
In the context menu, select Create, Data source or Folder, and the place to insert.
-
-
To create more data sources or folders:
-
Right-click on an existing data source, folder, or Master Synchronization Point.
-
In the context menu, select Create, Data source or Folder, and the place to insert.
-
-
-
If you selected Folder, enter the folder name and description and select
 .
. -
If you selected Date source, select the data source type and select
.noteThe following steps differ depending on the selected data source type.
-
Save.
Create Master Synchronization Point
Create Master Synchronization Point
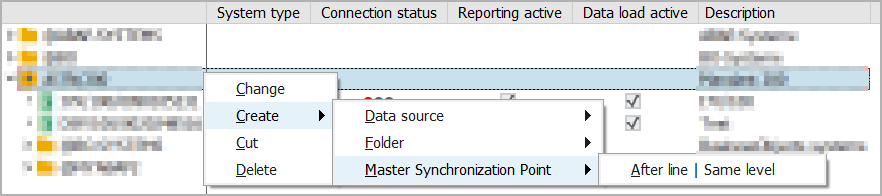
A Master Synchronization Point must not contain any data sources that already exist in the data source administration.
-
Select
. -
Do one of the following:
-
Create a very first entry:
-
Right-click in the empty area.
-
In the context menu, select Create, Master Synchronization Point, and the place to insert.
-
-
Create another Master Synchronization Point:
-
Right-click on an existing data source, folder, or Master Synchronization Point.
-
In the context menu, select Create, Master Synchronization Point, and the place to insert.
-
-
-
In the pop-up, enter the Master Synchronization Point name and description.
-
Enter the RFC destination.
-
To load the system data of Submaster data sources, select Load submaster data.
-
Deselect the activation of the Master Synchronization Point if necessary.
-
Select
. -
Save.
Rename Master Synchronization Point folder or data source
Rename Master Synchronization Point folder or data source
The names of folders and data sources are unique in the data source administration. Hence, if the name of a folder, BusinessObjects data source, or external data source of loaded Submaster system data already exists in the data source administration, an ascending number is added to the name in arrow brackets.
You can also change the names of folders, BusinessObjects data sources, and external data sources in Master Synchronization Points manually.
-
Select
. -
Right-click on an existing folder, BusinessObjects data source, or external data source of the Master Synchronization Point.
-
In context menu, select Change.
-
In the pop-up, enter the name.
tipThe Original-ID field shows the original name of the folders.
-
Select
. -
Save.
Check connection status
Check connection status
-
Select
. -
Right-click on a data source entry.
-
In the context menu, select Check connection status.
You can check the connection status of many data sources at once using the Connection status of data sources report.
Reload system data
Reload system data
-
Select
. -
Right-click on a data source entry.
-
In the context menu, select Reload system data.
Assign reporting group
Assign reporting group
Before you can assign reporting groups, you must create reporting groups in Reporting groups.
-
Select
. -
Right-click on a data source entry.
-
In the context menu, select Maintain reporting groups.
-
In the pop-up, select or deselect the checkboxes of the reporting groups.
-
Select
. -
Save.
Data source types
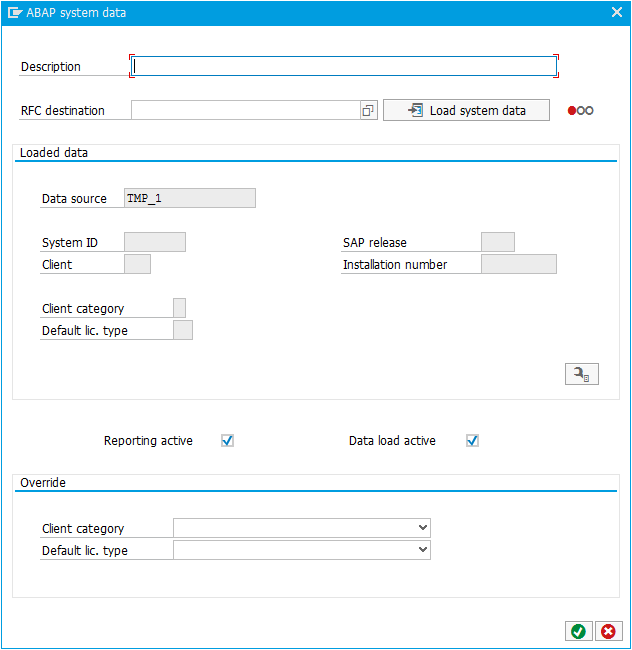
Create ABAP data source entry
Create ABAP data source entry
-
Enter the description.
-
Enter the RFC destination.
-
To activate the system connection and load system data, select Load system data.
noteAfter you loaded the system data, the data fields below Loaded data are filled automatically. By selecting
 , you can show detailed data which is also filled in automatically.
 -
If required, deselect checkboxes.
-
If an override is required, select the client category and default license type.
-
Select
.
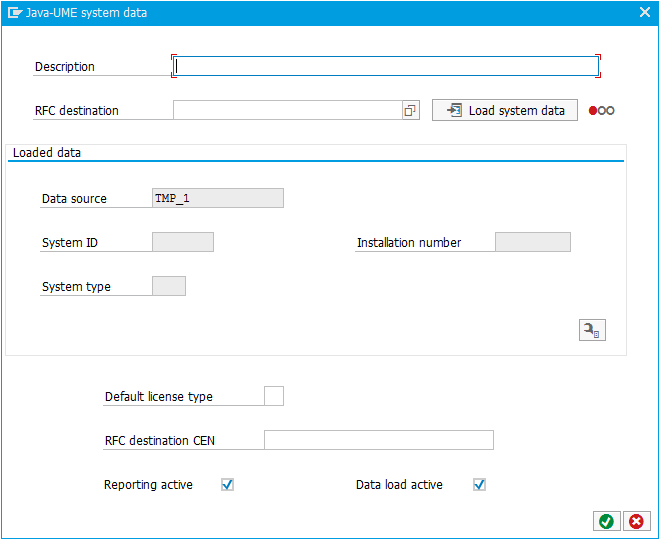
Create JAVA-UME data source entry
Create JAVA-UME data source entry
-
Enter the description.
-
Enter the RFC destination.
-
To activate the system connection and load system data, select Load system data.
noteAfter you loaded the system data, the data fields below Loaded data are filled automatically. By selecting
, you can show detailed data which is also filled in automatically. -
Enter the default license type.
-
Enter the RFC destination CEN.
-
If required, deselect checkboxes.
-
Select
.
Create HANA data source entry
Create HANA data source entry
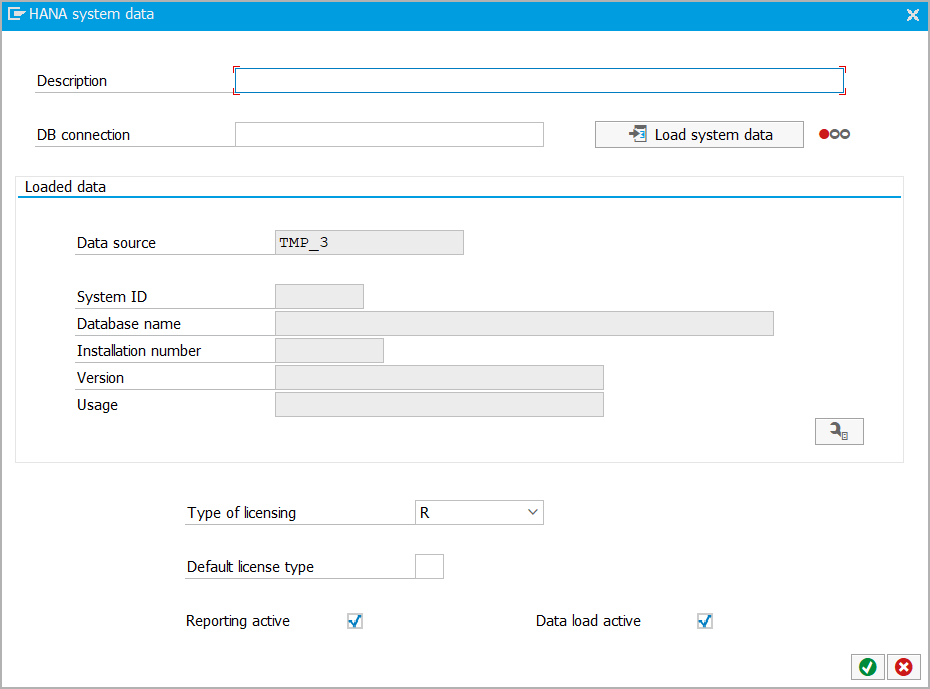
-
Enter the description.
-
Enter the HANA database connection.
-
To activate the system connection and load system data, select Load system data.
noteAfter you loaded the system data, the data fields below Loaded data are filled automatically. By selecting
, you can show detailed data which is also filled in automatically. -
Enter the default license type.
-
If required, deselect checkboxes.
-
Select
.
Create BusinessObjects data source entry
Create BusinessObjects data source entry
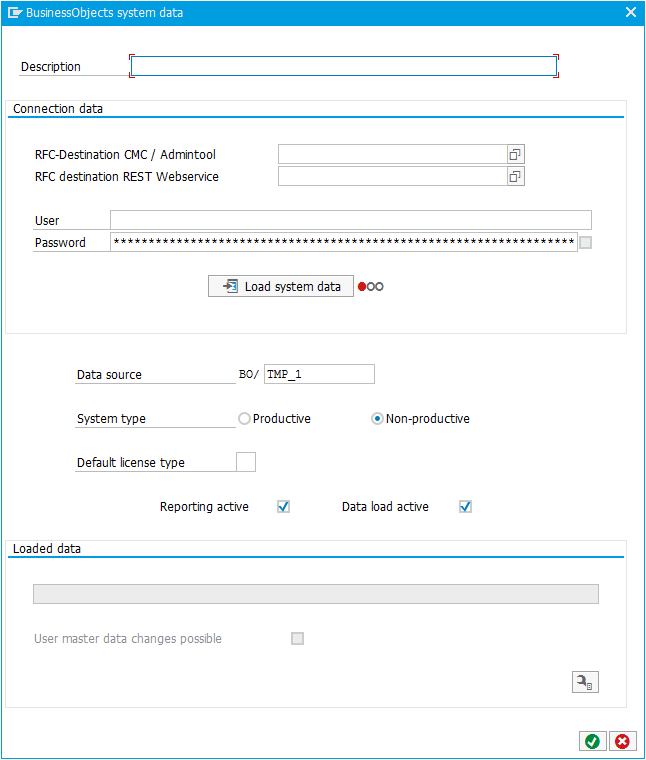
-
Enter the description.
-
Enter the RFC destination CMC and the RFC destination REST.
noteYou have to enter the RFC destination REST Webservice only for changing, not for reading data.
-
Enter the user name and password.
-
To activate the system connection and load system data, select Load system data.
noteAfter you loaded the system data, the data fields below Loaded data are filled automatically. By selecting
, you can show detailed data which is also filled in automatically. -
Enter the data source name.
-
Select the system type.
-
Enter the default license type.
-
If required, deselect checkboxes.
-
Select
.
Create S/4HANA Cloud data source entry
Create S/4HANA Cloud data source entry
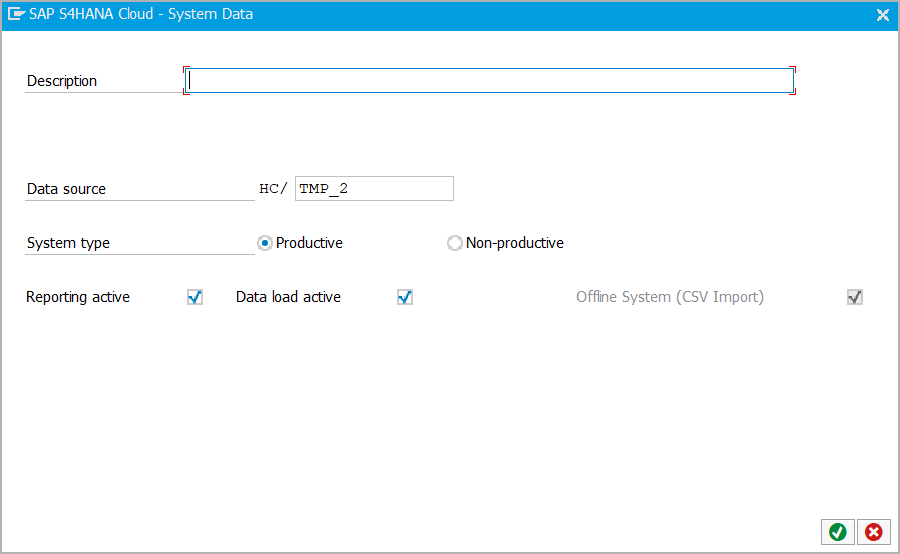
-
Enter the description.
-
Enter the data source name.
-
Select the system type.
-
If required, deselect checkboxes.
-
Select
.
Create external system data source entry
Create external system data source entry
Before you can create entries for external system data sources, you have to create external system types in Manage external system types.

-
Enter the description.
-
Enter the external system type.
-
Enter the data source name.
-
Enter the default license type.
-
If required, deselect checkboxes.
noteBy selecting
, you can show detailed data which is also filled in automatically. -
Select
.